Module RFID: RC522 + HZ1050 + PN532.
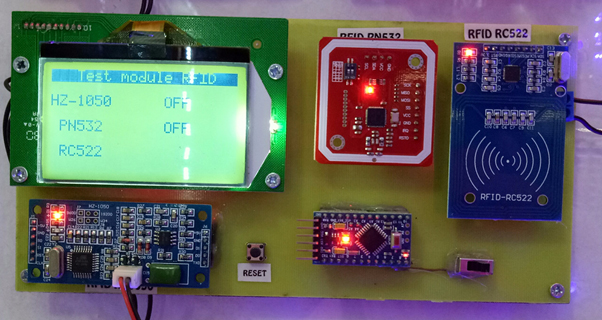
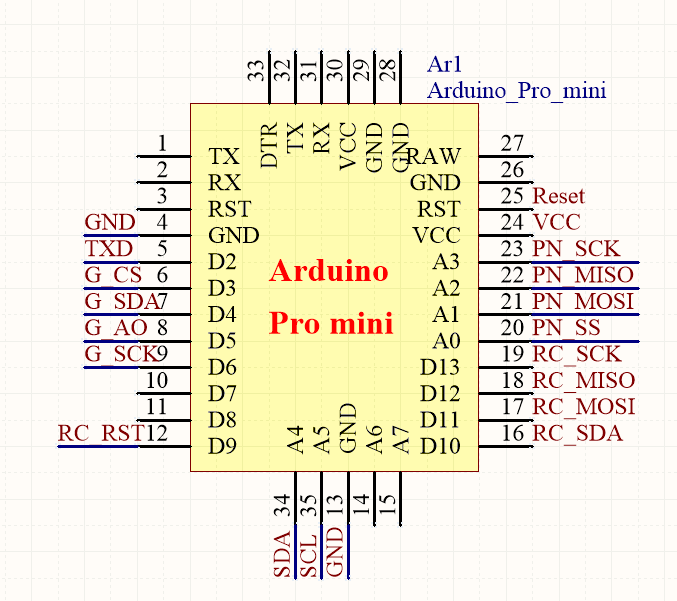
Mạch showboard sử dụng Arduino Pro Mini, LCD Gphone, và 3 loại module RFID: RC522, HZ1050, PN532.
Mạch sử dụng LCD Gphone có độ phân giải 128x64 hiển thị được nhiều thông tin mà giá thành vừa phải, dễ dàng sử dụng:
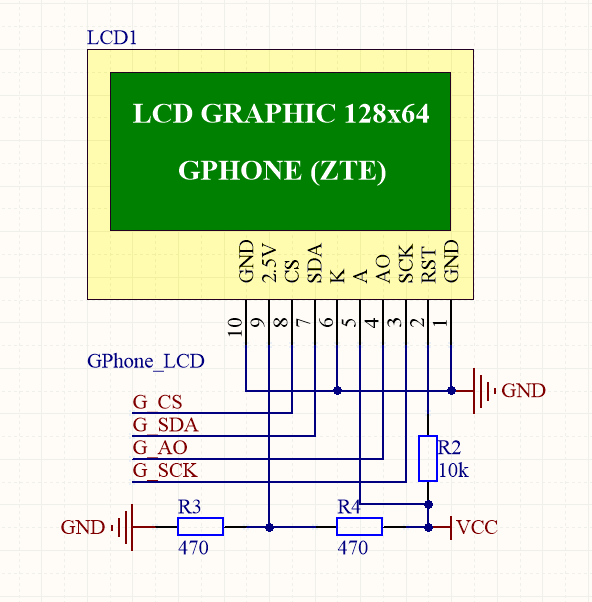

Trong code mẫu đã có sẵn 2 file thư viện Gphone.cpp và Gphone.h, các bạn thêm vào file code Arduino và #include thư viện đó vào để sử dụng.
-
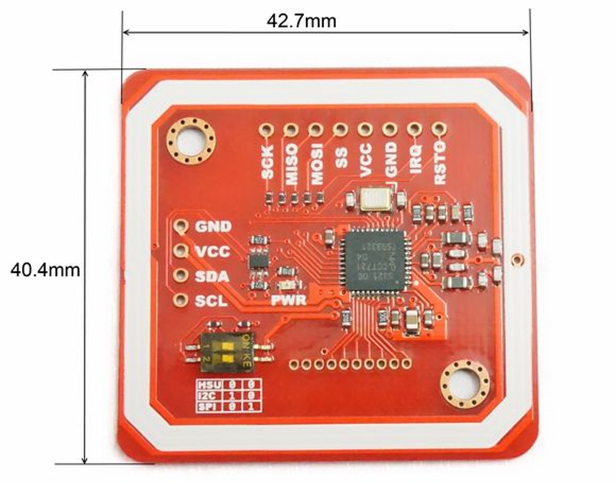
Module RFID RC522
Module đọc thẻ RC522 có thể đọc được các loại thẻ có kết nối không dây như NFC, thẻ từ (loại dùng làm thẻ giảm giá, thẻ xe bus, tàu điện ngầm...). Module có các thông số chính như:
- Điện áp nuôi: 3.3V;
- Dòng điện nuôi :13-26mA
- Tần số hoạt động: 13.56MHz
- Khoảng cách hoạt động: 0 ~ 60 мм
- Cổng giao tiếp: SPI, tốc độ tối đa 10Мbps
- Kích thước: 40мм х 60мм
- Có khả năng đọc và ghi.
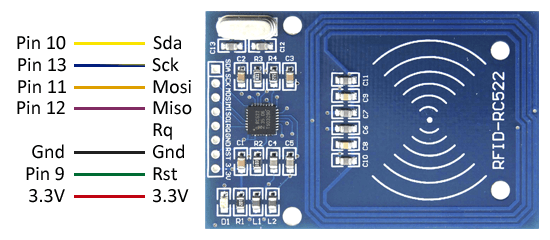
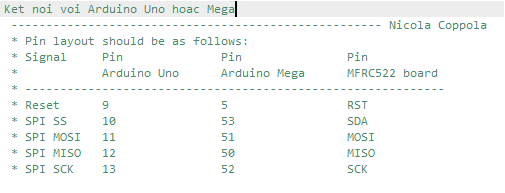
Kết nối module với Arduino :

Các bạn thêm thư viện file rfid.zip trong thư mục Lib vào thư viện Arduino.
Code mẫu đọc mã thẻ từ gửi mã lên Serial Monitor.
#include <MFRC522.h>
#include <SPI.h>
#define SS_PIN 10
#define RST_PIN 9
MFRC522 rfid(SS_PIN, RST_PIN); // Instance of the class
String uidString;
void setup() {
Serial.begin(9600);
SPI.begin(); // Init SPI bus
rfid.PCD_Init(); // Init MFRC522
}
void loop() {
if( rfid.PICC_IsNewCardPresent())
{
rfid.PICC_ReadCardSerial();
uidString = String(rfid.uid.uidByte[0],HEX)+" "+String(rfid.uid.uidByte[1],HEX)+" "+String(rfid.uid.uidByte[2],HEX)+ " "+String(rfid.uid.uidByte[3],HEX);
Serial.println(uidString);
}
delay(100);
}
-
Module NFC RFID PN532
Module PN532 có 3 kiểu giao tiếp I2C, SPI, UART chọn bằng cách thay đổi công tắc chọn trên Module.
|
Arduino |
Module PN532 |
|
VCC / 5V |
VCC |
|
GND |
GND |
|
0-RX |
TXD |
|
1-TX |
RXD |
Copy các tất cả thư mục ở trong thư mục PN532-master vào thư mục chứ Thư viện của Arduino theo địa chỉ: C:\Users\My-PC\Documents\Arduino\libraries.
Trong code mẫu sử dụng giao tiếp UART với Arduino (TX-RX, RX-TX)
|
#include <PN532_HSU.h> #include <PN532.h> PN532_HSU pn532hsu(Serial); PN532 nfc(pn532hsu);
void setup(void) { Serial.begin(115200); Serial.println("Hello!");
nfc.begin();
uint32_t versiondata = nfc.getFirmwareVersion(); if (! versiondata) { Serial.print("Didn't find PN53x board"); while (1); // halt }
// Got ok data, print it out! Serial.print("Found chip PN5"); Serial.println((versiondata>>24) & 0xFF, HEX); Serial.print("Firmware ver. "); Serial.print((versiondata>>16) & 0xFF, DEC); Serial.print('.'); Serial.println((versiondata>>8) & 0xFF, DEC);
// Set the max number of retry attempts to read from a card // This prevents us from waiting forever for a card, which is // the default behaviour of the PN532. nfc.setPassiveActivationRetries(0xFF);
// configure board to read RFID tags nfc.SAMConfig();
Serial.println("Waiting for an ISO14443A card"); }
void loop(void) { boolean success; uint8_t uid[] = { 0, 0, 0, 0, 0, 0, 0 }; // Buffer to store the returned UID uint8_t uidLength; // Length of the UID (4 or 7 bytes depending on ISO14443A card type)
// Wait for an ISO14443A type cards (Mifare, etc.). When one is found // 'uid' will be populated with the UID, and uidLength will indicate // if the uid is 4 bytes (Mifare Classic) or 7 bytes (Mifare Ultralight) success = nfc.readPassiveTargetID(PN532_MIFARE_ISO14443A, &uid[0], &uidLength);
if (success) { Serial.println("Found a card!"); Serial.print("UID Length: "); Serial.print(uidLength, DEC); Serial.println(" bytes"); Serial.print("UID Value: "); for (uint8_t i=0; i < uidLength; i++) { Serial.print(" 0x"); Serial.print(uid[i], HEX); } Serial.println("");
// wait until the card is taken away while (nfc.readPassiveTargetID(PN532_MIFARE_ISO14443A, &uid[0], &uidLength)) {} } else { // PN532 probably timed out waiting for a card Serial.println("Timed out waiting for a card"); } } |
-
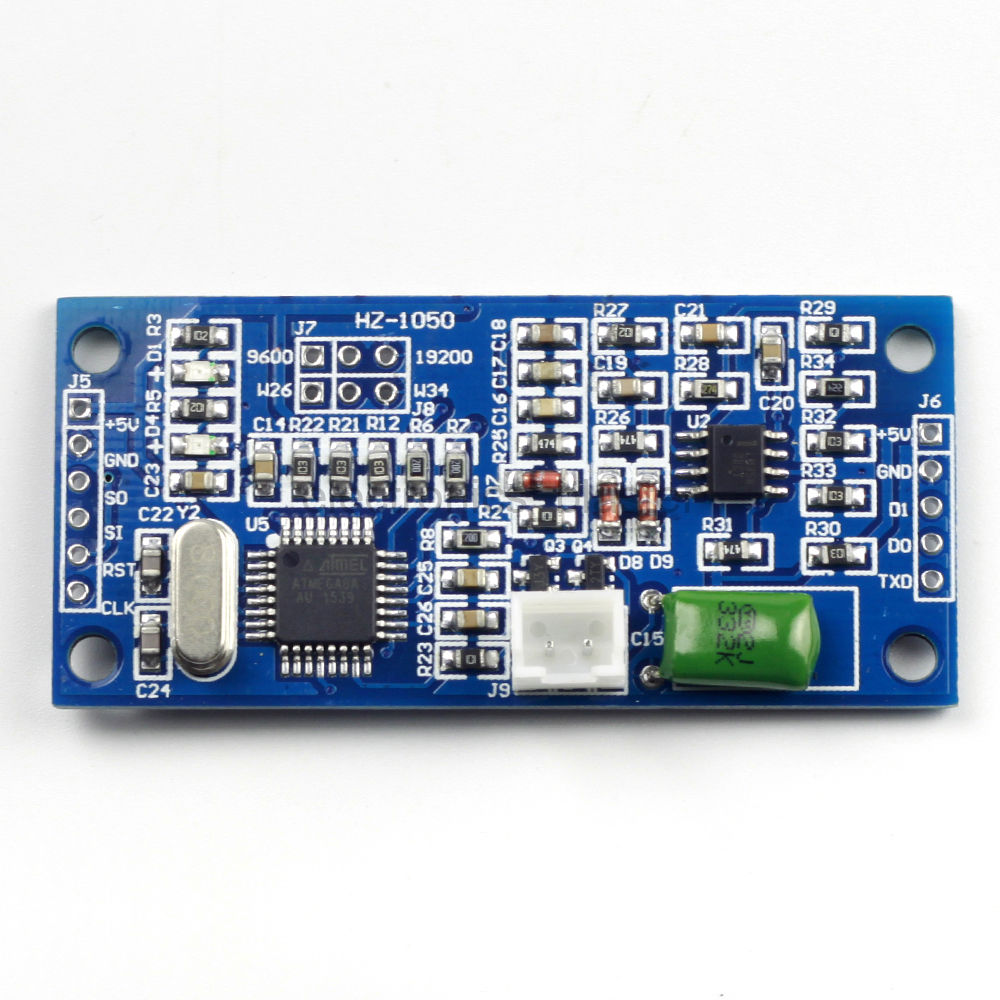
Module RFID HZ1050.
Trong mạch sử dụng giao tiếp UART đọc dữ liệu từ chân TXD của module.
|
Arduino |
Module HZ1050 |
|
VCC / 5V |
5V |
|
GND |
GND |
|
D2 |
TXD |
Code mẫu giao tiếp với Arduino:
|
#include <SoftwareSerial.h> #include <Wire.h>
SoftwareSerial RFID(2, 3); // RX and TX String uid_HZ1050 = ""; String uidString;
void setup() { Serial.begin(115200); RFID.begin(9600); // start serial to RFID reader } void loop() { if (RFID.available() > 0) { while (RFID.available() > 0) { uid_HZ1050 = uid_HZ1050 + " " + String(RFID.read(),HEX); } Serial.println(uid_HZ1050); delay(1000); uid_HZ1050 = ""; } }
|
Tải file mạch: TẠI ĐÂY
Tham khảo module rfid: https://chotroihn.vn/module-rfid


